Pre-Setup
I'm sure you'll know how to install Windows Server 2003, its basically done the same way as Windows XP. Assuming you want to run it as a workstation then leave the CAL (Client Access License) settings as they are when you come across it during Setup. Let's move on!
Post-Setup
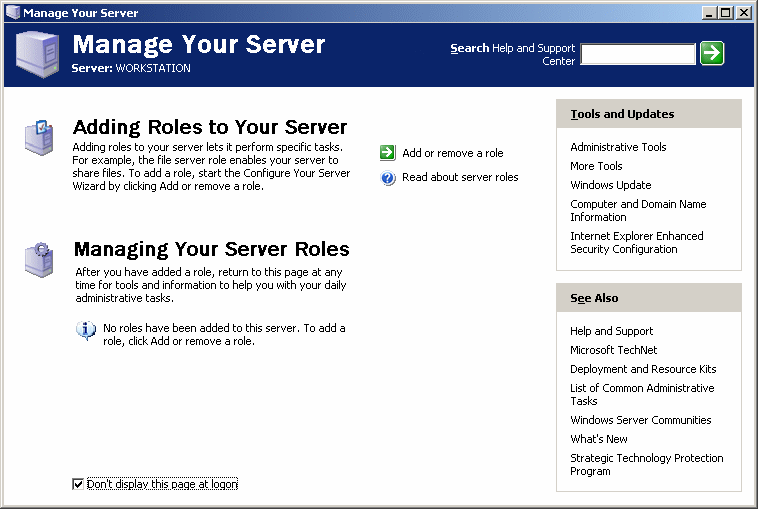
| The first thing you should do is disable the Manage Your Server window, you don't want it nagging you everytime you boot up Windows do you? Simply tick the box "Don't display this page at logon". You can access it later via Control Panel -> Administrative Tools -> Manage Your Server. |
|
The Welcome Screen is non-existant in Windows Server 2003, so you weren't prompted to make a new user name upon first boot-up. But worry not, its fairly simple to do, as everything in this guide is! I would like to thank Donald Morris for this new submission, replacing the advanced lusrmgr.msc (Local Users and Groups) completely.
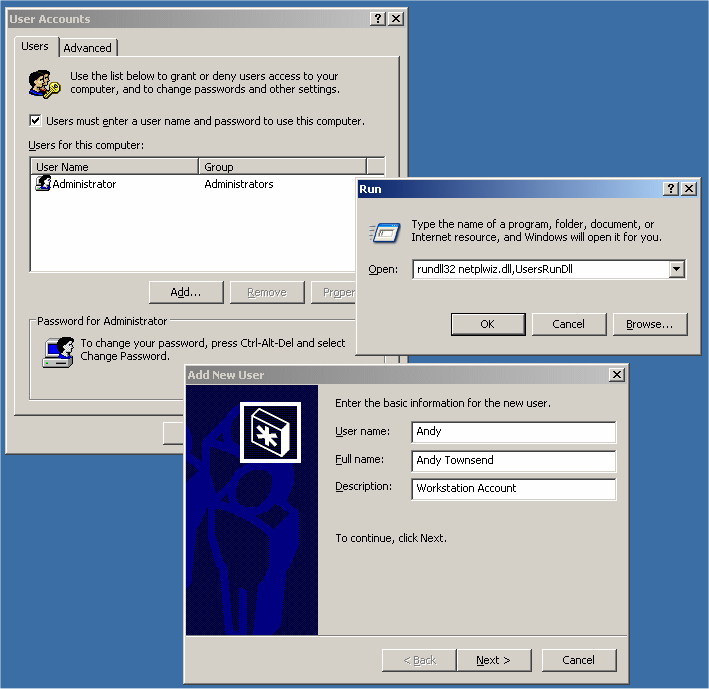 |
Go to Start -> Run -> and type in rundll32 netplwiz.dll,UsersRunDll and press enter. The User Accounts window will appear. Click on Add and then fill in the necessary fields with your User name, Full name, and Description. Click on Next and fill in both password fields as shown here and then click on Next. On the next wizard box as shown here, choose Other and select Administrators, lastly click on Finish! If you wish for a more advanced configuration, you can always use lusrmgr.msc by running it from the Run box again. Incase you're wondering, rundll32 netplwiz.dll,UsersRunDll is the same as control userpasswords2 |
|
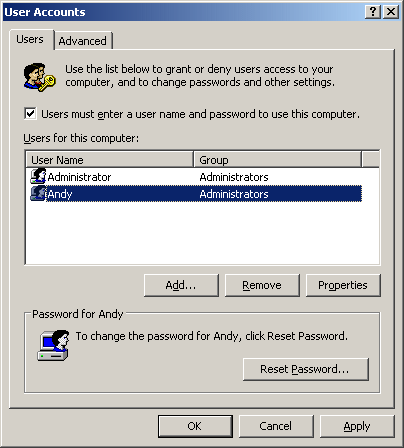
Now that we've set up a personal user account, we want it to autologon without the use of TweakUI. If you don't wish for this feature please skip this step. Make sure your name is highlighted in the User Accounts window, as shown in the screenshot to the right, and then uncheck the box Users must enter a user name and password to use this computer and then click on Apply. If you did it right, you will get another window asking for the password to use for autologon on your account name as shown in this screenshot here. Fill in both password fields, and you're ready to go! Now log off and log in with your new account! |
 |
You've managed to avoid the annoying CTRL+ALT+DEL prompt by using autologon... but it's still there! The CTRL+ALT+DEL prompt will still show up when you lock your PC (Winkey +L) or when you use a password protected screensaver. In here, we'll show you how to disable it completely.
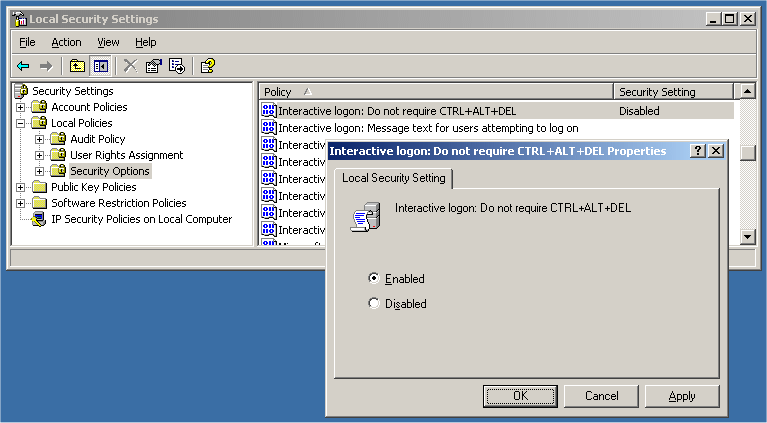 |
Go to Control Panel -> Administrative Tools -> Local Security Policy. Browse to Local Policies -> Security Options. On the right windows pane, scroll down until you find Interactive logon: Do not require CTRL+ALT+DEL, double click and then select Enabled (as shown in the screenshot) |
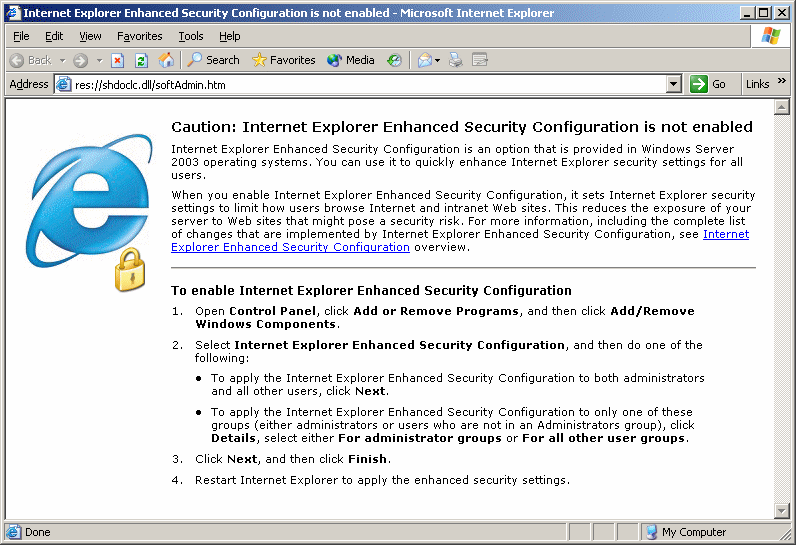
A new security feature of Windows Server 2003 has set Internet Explorer to high security by default, so you won't be able to browse any sites.
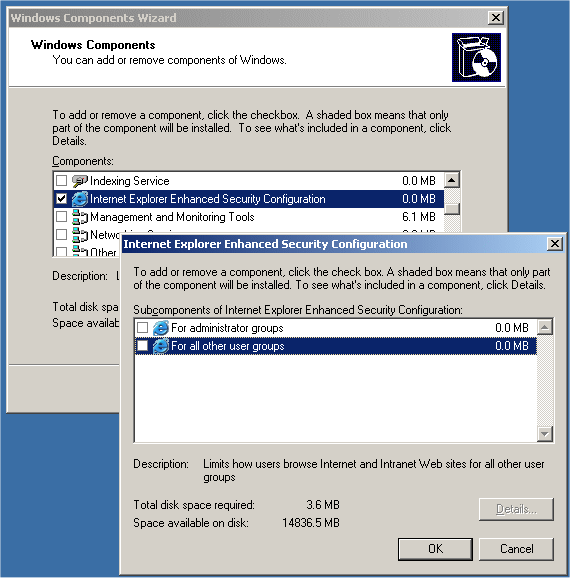 |
To remove Internet Explorer's Enhanced Security Configuration, we will need to do this via Add or Remove Programs. Go to Control Panel -> Add or Remove Programs -> Add/Remove Windows Components -> and then scroll down until you see Internet Explorer Enhanced Security Configuration. Click on Details and uncheck both boxes as shown in the screenshot to the left. Click OK and OK! |
|
Now fire up Internet Explorer and you'll be faced with the page as shown in the screenshot to the right, warning you that IE's Enhanced Security Configuration is not enabled. Simply change your homepage in Internet Explorer's options, and that's it, you won't be seeing it again! |
 |
Because Windows Server 2003 is a 'Server', the event tracker plays a crucial role so that it can keep logs on why the server was shutdown/rebooted. Since we want it to be a Workstation, we will easily attempt to disable this feature. Again, its so darn simple :-)
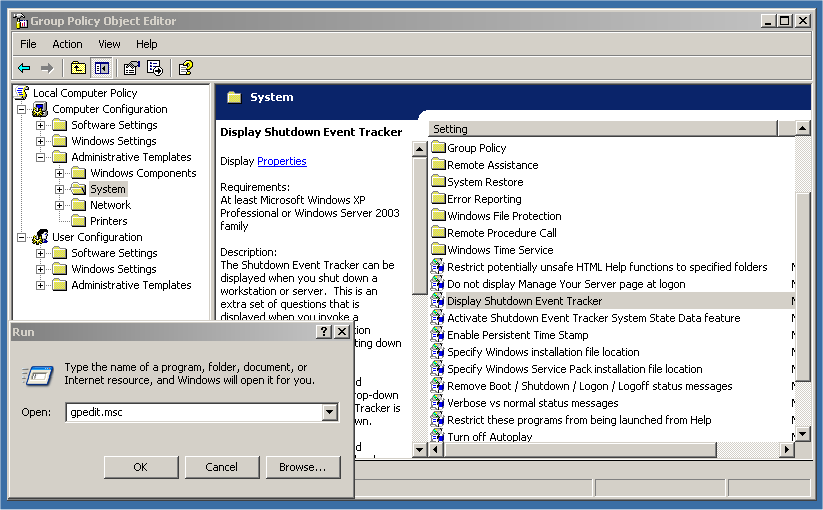 |
We will need to go into Group Policy Object Editor, go to Start -> Run -> and type gpedit.msc followed by enter. You should see the Group Policy Editor as shown on the left. Browse to Computer Configuration -> Administrative Templates -> System -> now look in the right window pane and double click on Display Shutdown Event Tracker. |
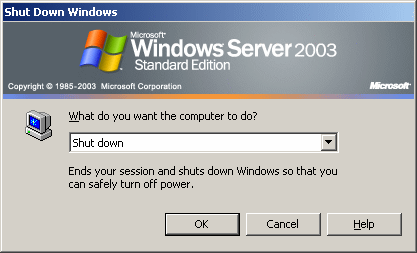
| This window will now appear, simply select Disabled and then proceed to click on OK. Now close the Group Policy Object Editor window. | If all goes well, you should get this when you attempt to shutdown: |
|
|
 |
Now that you have IE ready for Internet browsing, and disabled the Shutdown Event Tracker, now's a good time to start downloading and installing all those drivers! After you have done so, move on to the next section - where we will accelerate our Graphics card and enable DirectX!
Graphics Hardware Acceleration and DirectX are disabled by default on a Server configuration to ensure maximum stability and uptime. But for any reason you need to enable them to use DirectX enabled applications this section will guide you through on how you can do it.
Enabling Graphics Hardware Acceleration
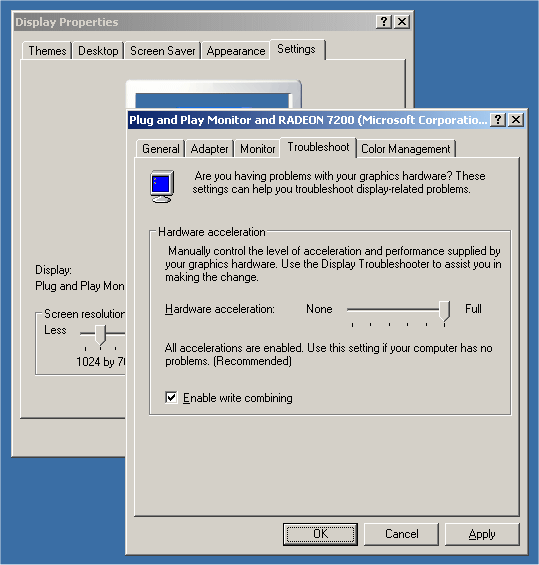 |
Let's start with enabling the Hardware acceleration on our graphics card. Simply right click anywhere on your desktop> and select Properties -> Settings tab -> Advanced -> and finally, the Troubleshoot tab. Now move the Hardware acceleration slider across to Full Click OK You may experience a monitor black out for a few seconds, this is normal. |
Enabling DirectX
|
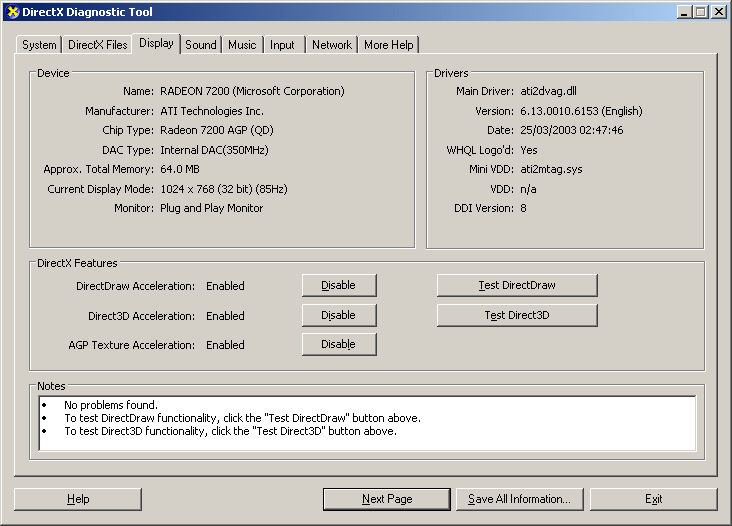
We now want to enable the full capabilities of DirectX. To do this, go to Start -> Run -> and type dxdiag followed by enter. You will get a dialog box asking if you want to allow dxdiag to access the internet to check for valid WHQL certificates - click on Yes. Let's click on the Display tab, now click on all three boxes to enable DirectDraw, Direct3D and AGP Texture Acceleration. |
 |
You guessed right, that's all you needed to do! You can now install your Win2K/XP drivers for your Graphics card and enjoy the full DirectX experience. (Later on in this guide, we will be installing DirectX 9.0a)
|
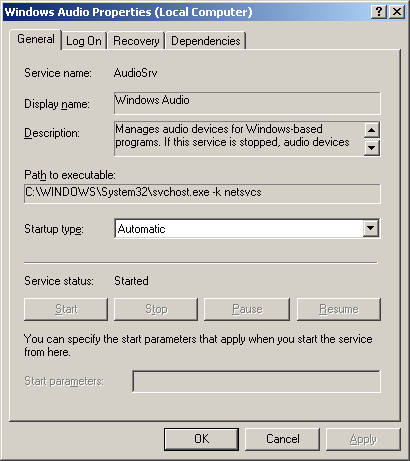
If you are using Windows Server 2003 Standard Edition, move on to the next step as the Windows Audio Service is already enabled. For other editions, read on. Go to Start -> Run -> and type Services.msc followed by enter. The Services window will appear, scroll down until you find "Windows Audio". Double click on Windows Audio -> and change the startup type to Automatic -> then Apply -> Start -> OK
|
 |
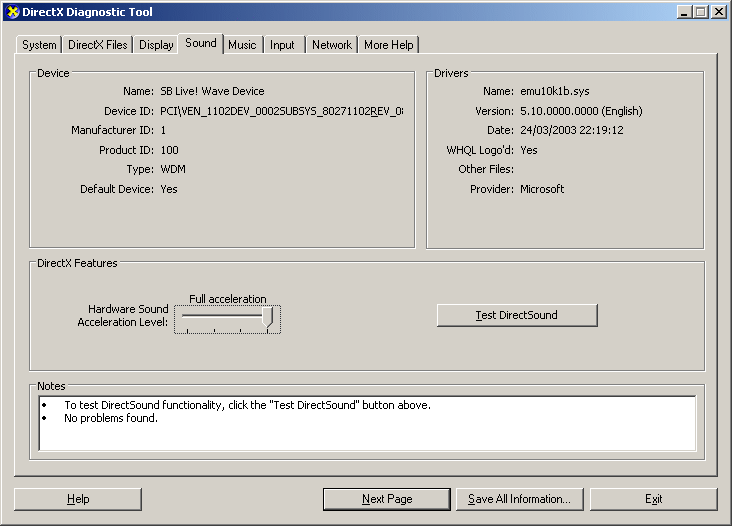 |
Lastly, we will need to go back into DirectX Diagnostics. Click on Start -> Run -> and type dxdiag followed by enter. This time, go to the Sound tab and move the slider on "Hardware Sound Acceleration Level" to Full Acceleration. |
Great! We have sound enabled, now go and grab a copy of Winamp and play some music to soothe yourself! :-)
Not forgetting, if you have a SB Live! card like I do, you should grab the LiveDrvUni-Pack for Win2K/XP dated 10th March 2003. There is absolutely no need to extract and install the drivers manually, because the setup program works just fine on Windows Server 2003!
|
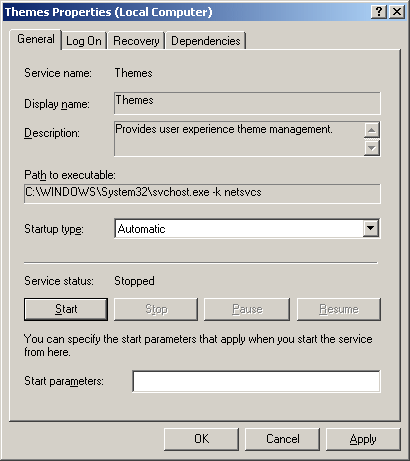
We will need to go back into Services to enable the Themes Services. Go to Start -> Run -> and type Services.msc followed by enter. Scroll down until you find "Themes", now double click on Themes -> change the startup type to Automatic -> Apply -> Start -> OK. Now close the Services window. For now you only have Luna Blue, Silver and Olive Green to choose from. |
 |
In this section we will show you how to:
|
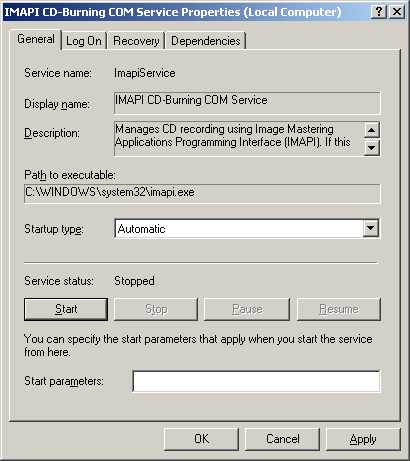
If you wish to use the inbuilt CD-Burning Service, follow these instructions: (Its recommended you leave this disabled if you want to speed up the Nero Burning ROM startup) Go to Start -> Run -> and type in Services.msc and scroll down until you find the "IMAPI CD-Burning COM Service", double click on IMAPI CD-Burning COM Service and select startup type Automatic -> Apply -> Start -> OK. Reboot to enable the CD Burning item in "Send-To". |
 |
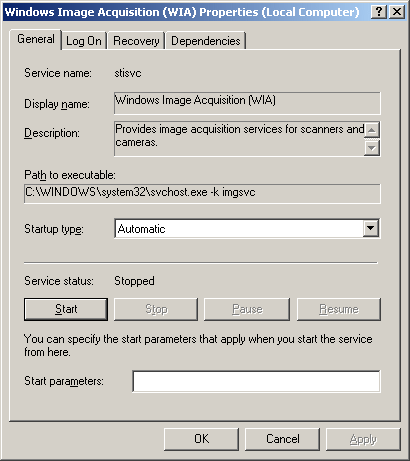 |
If you have a Camera, Webcam or Scanner, follow these instructions: Go to Start -> Run -> and type in Services.msc and scroll down until you find the "Windows Image Acquisition (WIA) ", double click on Windows Image Acquisition (WIA) and select startup type Automatic -> Apply -> Start -> OK.
|
In this section, we will go deep into the core of Windows Server 2003, where the memory and processor usage is handled. We will want to change some settings as it isn't currently optimized for Workstation usage.
|
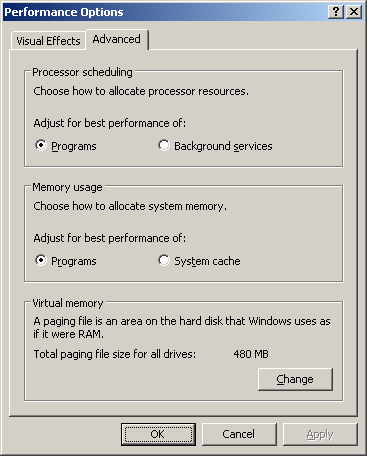
Let's go into Performance Options and change the performance settings for processor and memory resources. Here's how to get there: Go to Control Panel -> System -> Advanced -> Performance Settings -> Advanced tab. Change Processor scheduling to Programs and lastly, change Memory usage to Programs. Now click on OK.
|
 |
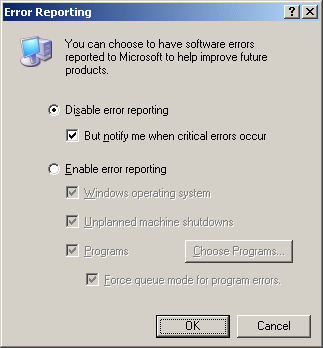 |
If you're still at the System Properties Window, you might want to disable Error Reporting. Click on Error Reporting -> and then choose Disable Error Reporting -> and tick But, notify me when critical errors occur. |
|
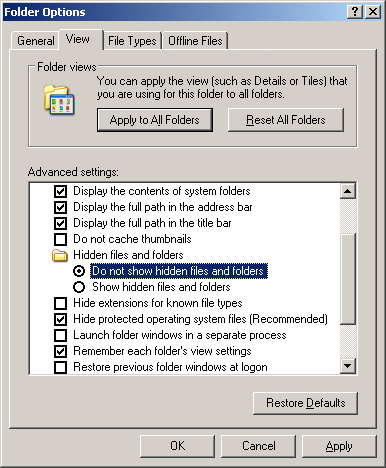
By default, all hidden files and folders are shown, you may want to hide this to reduce the number of files shown in Windows Explorer. It's clutter to me, is it to you? Hide them! Open any folder and go to Tools -> Folder Options -> View tab -> select Do not show hidden files and folders -> and lastly OK. |
 |